Green Eggs And Ham — Camp Fire Kids Celebrate Dr. Seuss
March 8, 2011
Volunteer readers recently helped celebrate Dr. Seuss’ birthday with the children at the Camp Fire USA Century Youth Learning Center. Joy Simpson and Faye Lee from Century pharmacy read Seuss favorites to the children as part of the Early Learning Coalition’s volunteer reading program. Submitted photos for NorthEscambia.com, click to enlarge.
Ernest Ward Middle School Names Students Of The Month
March 7, 2011
Ernest Ward Middle School Students of the Month for February have been named. They are Abigail Gudell, Annie Bobo and Thomas Moore.
Pictured: EWMS Students of the Month for February are Abigail Gudell, (left) Annie Bobo and Thomas Moore. Submitted photo for NorthEscambia.com, click to enlarge.
Grammy Award Winner Peforms At NHS FFA Blue Jacket Jamboree
March 6, 2011
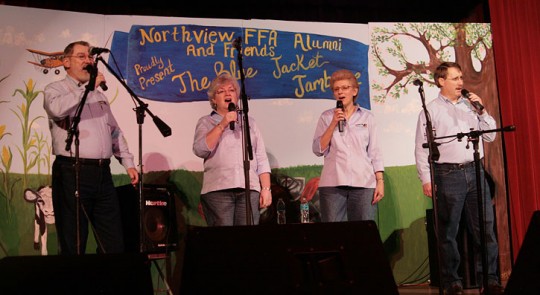
 Grammy Award winner Marty Raybon performed Saturday night during the Northview FFA Alumni Blue Jacket Jamboree in Bratt. He was joined by Northview’s own Ashton Gibbs and the Lookin’ Up Southern Gospel Quartet.
Proceeds from the concert benefited the Northview FFA Scholarship Fund which provides scholarship funds for graduating FFA students.
For a photo gallery from the event, click here.
The show was sponsored in part by NorthEscambia.com, Sheriff David Morgan, Escambia County Farm Bureau, Pensacola Interstate Fair, and Pioneer – A Dupont Company.
Marty Raybon is perhaps best known as the former lead singer of the country mega-group Shenandoah from 1985-1996. He led Shenandoah to 22 singles on the Billboard Hot Country Songs charts, including thirteen number one singles, such as: “The Church on Cumberland Road” (1989), “Sunday in the South” (1989), “Two Dozen Roses” (1989), “Next to You, Next to Me” (1990) and “Butterfly Kisses” (1997). At the top of the charts, Raybon became known for his bluegrass and gospel-influenced semi-traditional country sound.
Pictured above: Grammy Award winner Marty Raybon performs Saturday during the Northview FFA Alumni Blue Jacket Jamboree in Bratt. Pictured inset: Northview’s Ashton Gibbs performs. Pictured below: Lookin’ Up. NorthEscambia.com photos, click to enlarge.
Featured Recipe: Homemade Egg Rolls
March 6, 2011
This weekend’s featured recipe from Janet Tharpe is a Homemade Egg Roll. Have fun and fill them with any of a variety of fillings to satisfy everyone in your house.
To print today’s “Just a Pinch” recipe column, you can click the image below to load a printable pdf with a recipe card.
Birth: Aubrey Elizabeth Flowers
March 6, 2011
 Trent and Hannah (Gunter) Flowers are proud to announce the birth of their daughter, Aubrey Elizabeth Flowers.
Aubrey was born on Thursday, January 6, 2011 at 10:52 p.m. at USA Children’s and Women’s Hospital in Mobile, Alabama. She weighed 2 pounds, 11 ounces, and measured 15 inches in length.
Aubrey’s grandparents are Eddie and Vicky Gunter of McDavid, Jimmy and Kim Flowers of Atmore.
Aubrey was welcomed home by her big sister, Alli.
Sherrill Named To Dean’s List
March 6, 2011
 Kate Elizabeth Sherrill was recently named to the Dean’s List at Berry College for the fall semester.
Sherill is a junior majoring in vocal performance with a minor in theater. She is a member of the Berry Singers and the Berry Concert Choir. Sherill recently appeared in Berry’s production of Hecuba and was invited to participate in the Irene Ryan scholarship program for her role as Rhonda in Almost, Maine.
Sherrill is the daughter of Kent and Anne Sherrill of Walnut Hill and the granddaughter of Dean Graham and the late Sam Graham and the late Hunk and Senie Sherrill, all of Atmore.
Jay, Northview Students Create Sawmill Pageant Posters
March 3, 2011
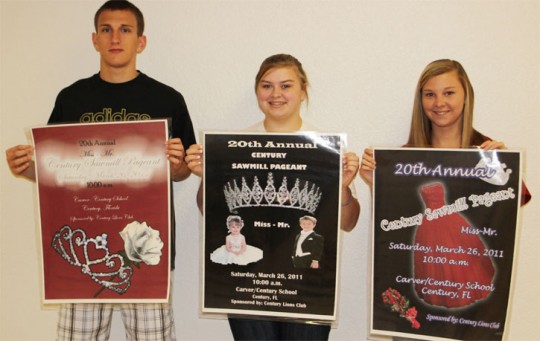
Students from Northview and Jay high schools were recently awarded for taking part in a poster contest to promote the 20th Annual Century Sawmill Pageant sponsored by the Century Lions Club.
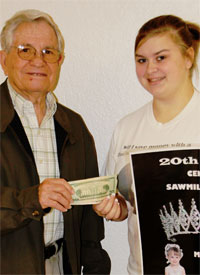 Winners from the Northview High School Business Technology Education Department were Rebecca Barnhill, first place; A.J. Lambert, second place; and Ashley Digmon, third place. Barnhill received a $25 prize.
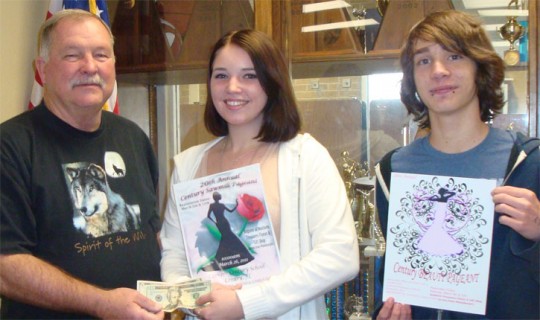
Winners from the Jay High School Commercial Graphic Arts classes were Haley Odom, first place; Damian Rogers, runner-up. Odom received a $25 prize.
The 20th Annual Century Sawmill Pageant sponsored by the Century Lions Club will be held Saturday, March 26 at 10 a.m. at the former Carver/Century School. Registration will be held Saturday, March 5 and March 12 from 10 a.m. until 5 p.m. at Southern Treasures Gift Shop at 8341 North Century Boulevard (across from Whataburger). For an entry form and more registration details, click here.
Pictured: 20th Annual Century Sawmill Pageant poster contest winners. Top: From Northview High — Rebecca Barnhill, first place; A.J. Lambert, second place; and Ashley Digmon, third place. Barnhill received a $25 prize. Bottom: From Jay High — Century Lions Club member Bill Gandy, Haley Odom, first place; Damian Rogers, runner-up. Pictured inset: Northview’s winner Rebecca Barnhill receives her $25 prize from Century Lions Club member Edsol Smith. Submitted photos for NorthEscambia.com, click to enlarge.
Louisiana College Students Use Spring Break To Help Molino Church
March 2, 2011
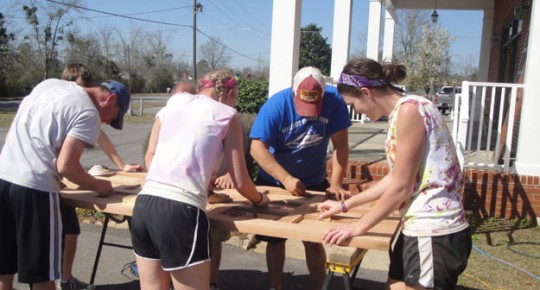
A group of Louisiana college students used their spring break to help a Molino church.
About 40 college ministry members of Temple Baptist Church in Ruston, Louisiana, actually paid $100 each for the opportunity to travel to Molino and work around the campus of Highland Baptist Church. From painting, to replacing a rotten bathroom subfloor under a toilet, to creating a classroom for a new Sunday School group, to landscaping and a lot of energy efficient lighting upgrades, the students performed numerous tasks for the church.
“We feel like our spring break is better spent if we help others instead of if we just sit around and do nothing,” Louisiana Tech student David Hinds said. “It’s better to serve others.”
 For the past eight years, the 1,000-member Louisiana church has sent spring breakers to places like Miami, Seattle and San Diego to serve. The Molino visit became a reality because of a friendship between Highland Baptist Pastor Brian Calhoun and a minister at Temple Baptist.
A project list was created and supplies were purchased prior to the students’ arrival. They worked Friday, Saturday and Monday at Highland. And yes, they did manage a brief two hour trip to the beach between Sunday church services — but they were hard at work ministering while they were there.
“We try to use our spring break to help others to further the Kingdom in whatever we do,” Hinds said.
“It was just a labor of love. We didn’t deserve this; it was selfless sacrifice,” Calhoun said. “It reminds me of the selfless sacrifice of Jesus.”
Tuesday, the students that worked at Highland joined about 20 other Temple Baptist members at the University of West Florida to cook lunch for about 350 UWF students before heading back to Louisiana for class.
Photo Gallery: Relay For Life Mardi Gras Masquerade
March 2, 2011
A Mardi Gras King and Queen were named in Century last Saturday night as over $900 was raised in a silent auction to benefit the American Cancer Society’s Relay for Life.
Cesar Gonzalez and Lauryn Walker were crowned Century’s King and Queen of Mardi Gras in recognition of raising the most money during the Relay Mardi Gras Masquerade. The event also included entertainment from the Will Inspire band (complete with a conga line), gumbo, red beans and rice and the quintessential Mardi Gras dessert –moon pies.
For more photos from the event, click here.
Pictured: Century’s Mardi Gras Masquerade King Cesar Gonzalez and Queen Lauryn Walker. Submitted photos for NorthEscambia.com, click to enlarge.
Sea Of Purple: What’s That Purple Flower That’s Everywhere Called?
March 2, 2011
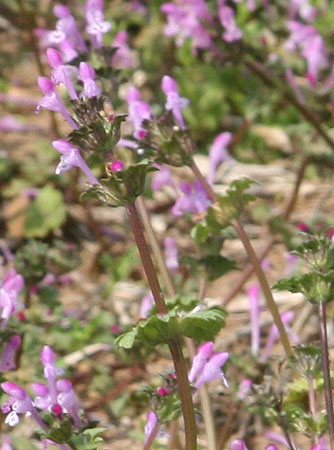 Ever wonder what the name of that that purple flower is that is blooming everywhere in North Escambia, often turning entire fields (or the corner of a neighborhood yard) into a sea of purple?
We posed the question to UF IFAS Escambia County Extension Agent Libbie Johnson and found out it’s called henbit (or more scientifically, Lamium amplexicaule):
Henbit is a cool season, annual broadleaf weed that germinates in the fall and continues to grow throughout the winter and spring. In some of Escambia County’s agricultural fields, it is currently one of the dominant species present.
Henbit is a member of the mint family. If you take a good look at it, you can see that it has square, slender stems. The stems can root at the lower nodes. Leaves are opposite, nearly circular, deeply veined, hairy and petioled. This isn’t a deeply rooted plant—roots are shallow and fibrous. The tubular flowers are generally purple to pink in color.
“Like most plants, the best control is achieved before the plants start to flower. Herbicides work better if you can spray when the plants are small and immature, but with the cold winter, scouting planted pasture for weeds may not have been on the top of the list of activities. For many, no control of henbit is necessary. Contact your local Extension agent to determine which herbicide would work best for your particular cropping system,” Johnson said.
Pictured: A sea of purple is formed by henbit in a field along Highway 97 at Tungoil Road in Walnut Hill.


